How to measure your backreamer
To obtain an accurate measurement of the diameter your reamer will cut, place a straightedge or flat board parallel to the shaft, across the top cutter. Be sure to keep it level. Measure up from the middle of the shaft, perpendicular to your straightedge. Double this measurement to calculate your reamer’s true diameter.

Don’t try to cut corners and take measurements by simply following the angle of the blade or measuring the body of the reamer. Your measurement should always encapsulate the furthermost edge of your widest cutter. Measuring only the body (the solid part) of the reamer will leave you with a hole that is much bigger than anticipated. Now that you’ve got an accurate reading on your reamer’s measurements, what size do you need, based on your job conditions?
How to determine the right reamer size
When selecting the right backreamer, the general rule of thumb is the size of your backreamer so that it is 1.5x bigger than the outside diameter of the pipe you’re pulling in. Of course, there are some exceptions. Let’s take a look.
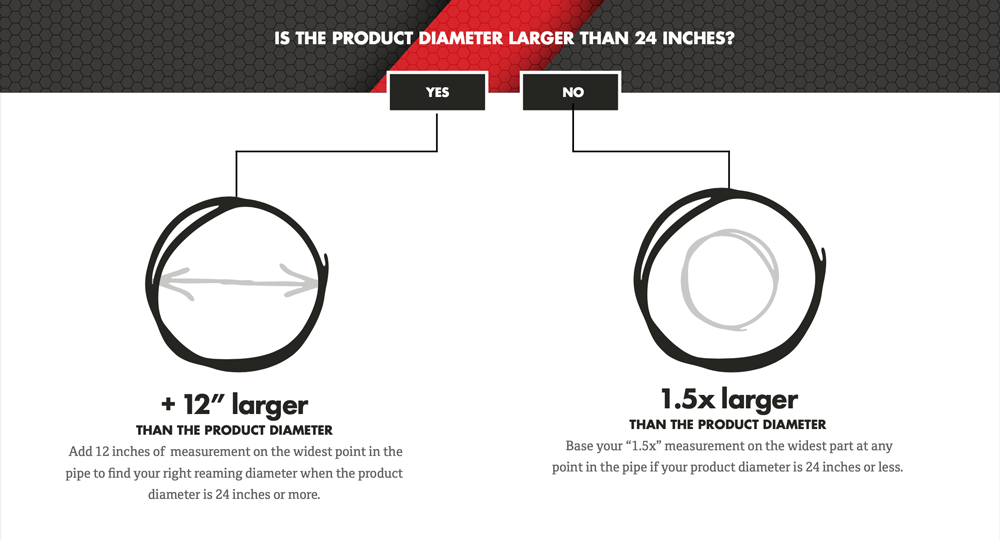
- Product pipe diameter. Think about the diameter of your pipe, including the ends where two pieces slip together. Those areas might be up to 2” wider than the diameter of the main pipe. Make sure that you’re basing your “1.5x” measurement on the widest part at any point in the pipe.
- Solid rock. It’s not always necessary to use a 1.5x overcut when drilling into rock. You know you’ll have a sturdy bore that is not in danger of collapse or ground swelling. You also won’t have a lot of slurry in the hole. In these conditions, you can come down to a hole diameter that is a bit closer to the diameter of your pipe.
- On-grade bores. Drilling to match a grading specification, like in the case of sewer lines, usually means that there’s a tighter tolerance for bore size. Bore paths must be within a few percentage points of the diameter of the pipe. In this case, you’ll want to drill as tight of a hole as possible without the risk of squeezing or stretching the product pipe. We build special reamers for on-grade pipe installations. Give us a call to discuss your specific needs.
- Clay. In this soil type, it’s important to strictly adhere to the 1.5x diameter rule–or even add a little extra. Clay swells when liquid (like your drill fluid) is introduced, then shrink back down as it dries. Drilling an insufficient hole might seem permissible when the hole is wet, but your pipe could feel the pressure as the clay solidifies.
- Unstable conditions. In cobble, sand or other unstable material, extra space makes it easier to pull product through. Make sure to allow sufficient clearance in these situations by drilling a hole that is 1.5x the size of your diameter.
- Length of the bore. If you’re drilling a short bore (under 150 feet), you might be able to get away with lesser clearance around your pipe. Shorter bores make it easier to remove cuttings from the hole, so you don’t have to worry about material filling up the hole and cramping your pipe. In longer bores, be sure to drill a hole with enough space surrounding the pipe, to make up for unreachable cuttings that are left behind.
Why Worry About The Right Size Hole?
Drilling the right size hole can have a major impact on your job. Too small of a hole and your job takes forever, you risk humping the road during pullback, or your product pipe can stretch or break (which is a great reason to use a breakaway connector, by the way.) Too big, and you require more expensive tooling and drill fluid, your progress goes slower, you risk encroaching on other lines or your pipe can sink with time.
Measure Twice, Ream Once
When measuring your reamer and choosing the right tool for the job, it’s always a good idea to double-check everything. The markings on the outside of your reamer are a great starting place, but as time and work take a toll on your directional drilling tools, broken or shaved down cutters can alter the true size of your reamer.
For more information about the right directional drilling tools for your job, contact your local Melfred Borzall distributor today.